In a busy IT environment, manual onboarding is a time-consuming process that is prone to human error. While cloud-based suites often provide built-in greeting features, Exchange On-Premises lacks a native ‘Auto-Welcome’ toggle for new mailboxes. To bridge this gap, the most robust and scalable solution is a customized PowerShell automation. In this post, I’ll show you how to build a script that identifies new users and delivers a professional, branded welcome experience automatically.
1. The Strategy: Differential Tracking
Because the goal is to target only new users, the script must distinguish between a fresh mailbox and an established account. We achieve this by querying the WhenMailboxCreated metadata. By applying a time-relative filter, the script can isolate accounts created within a specific window (e.g., the last 60 minutes or 24 hours), ensuring that long-term employees don’t receive redundant onboarding mail.
The Logic Flow
Step 1: Scan & Identify – The script queries the Exchange environment to find mailboxes where the WhenMailboxCreated timestamp is greater than the defined $TimeLimit.
Step 2: Filter & Validate – To avoid “Welcome” emails being sent to service accounts or discovery mailboxes, we filter the results. Additionally, we check a Custom Attribute (e.g., CustomAttribute1) to verify if a welcome email has already been sent, providing a “failsafe” against duplicates.
Step 3: Execution – For every valid new user identified, the script generates a stylized HTML body, pulls the organization name from the Company attribute, and dispatches the email via SMTP relay.
Step 4: Persistence – After a successful send, the script updates the user’s mailbox attribute to “WelcomeSent,” effectively marking the task as complete for that specific identity.
Step 5: Automation – Finally, we utilize Windows Task Scheduler to trigger the script at regular intervals, creating a fully autonomous onboarding loop.
2. The PowerShell Script
You can run this on your Exchange Management Shell.
<#
.SYNOPSIS
    Exchange On-Premise New User Welcome Mailer
.DESCRIPTION
    Scans for new mailboxes created in the last 60 minutes and sends a
    branded HTML welcome email with an attachment.
.AUTHOR
    MAHARJAN-BINOD
#>

# --- 1. PRE-REQUISITES ---
if (!(Get-PSSnapin Microsoft.Exchange.Management.PowerShell.E2010 -ErrorAction SilentlyContinue)) {
    Add-PSSnapin Microsoft.Exchange.Management.PowerShell.E2010
}

# --- 2. CONFIGURATION ---
$MinutesBack = 60
$TimeLimit = (Get-Date).AddMinutes(-$MinutesBack)
$SMTPServer = "127.0.0.1"
$From = "HR-Onboarding@maharjan.com.np"
$AdminCC = "exgadmin@maharjan.com.np"
$ManagerBCC = "audit-logs@maharjan.com.np"
$AttachmentPath = "C:\Reports\Combined_MailboxLoginReport.html"

# --- 3. EXECUTION ---
Write-Host "Scanning for new mailboxes since $TimeLimit..." -ForegroundColor Cyan

$NewMailboxes = Get-Mailbox -ResultSize Unlimited | Where-Object {
    $_.WhenMailboxCreated -gt $TimeLimit -and $_.CustomAttribute1 -ne "WelcomeSent"
}

if ($NewMailboxes -ne $null) {
    foreach ($User in $NewMailboxes) {
        $OrgName = $User.Company
        if ([string]::IsNullOrWhiteSpace($OrgName)) { $OrgName = "MAHARJAN-BINOD" }

        $To = $User.PrimarySmtpAddress
        $DisplayName = $User.DisplayName
        $Subject = "Welcome to $OrgName - New Account Created"

        $Body = @"
        <!-- Beautiful HTML Email Template Logic Starts Here -->
        <div class='header'>Welcome to the Team, $DisplayName!</div>
        <!-- [Template Code Included in actual script] -->
"@

        try {
            $Params = @{
                SmtpServer = $SMTPServer
                Port       = 25
                From       = $From
                To         = $To
                Cc         = $AdminCC
                Bcc        = $ManagerBCC
                Subject    = $Subject
                Body       = $Body
                BodyAsHtml = $true
                Priority   = "High"
                ErrorAction = "Stop"
            }

            if (Test-Path $AttachmentPath) {
                $Params.Add("Attachments", $AttachmentPath)
            }

            Send-MailMessage @Params
            Set-Mailbox -Identity $User.DistinguishedName -CustomAttribute1 "WelcomeSent"

            Write-Host "SUCCESS: Welcome mail sent to $To" -ForegroundColor Green
        }
        catch {
            Write-Warning "Failed to send to $To."
        }
    }
}
3. Implementation Steps
A. Designing the HTML Template
To provide a premium onboarding experience, we move away from “Plain Text” and utilize an HTML-embedded string. This approach transforms a standard system notification into a professional corporate announcement. By using HTML, you can include:
- Corporate Identity: Embed high-resolution company logos and brand-consistent color schemes.
- Actionable Links: Provide direct hyperlinks to the Employee Handbook, HR Portal, or Company Intranet.
- Visual Hierarchy: Use CSS to emphasize key instructions, making the email easy to scan and digest.
B. Preventing Duplicate Notifications (The “Safety Switch”)
If the script is scheduled to run frequently (e.g., every hour), there is a risk of sending multiple “Welcome” emails to the same user within the 24-hour creation window. To ensure a “1-User-1-Email” policy, we utilize an Exchange Custom Attribute as a persistence flag:
- Check: The script queries
CustomAttribute1to see if it is null or empty. - Dispatch: If empty, the script sends the onboarding email.
- Stamp: Upon a successful send, the script updates the mailbox using:
Set-Mailbox $User -CustomAttribute1 "WelcomeSent"This “stamps” the user, ensuring they are excluded from all future script cycles.
C. Continuous Automation via Task Scheduler
To achieve a truly “hands-off” administrative workflow, we automate the execution using the Windows Task Scheduler:
- Preparation: Save the finalized code as
Send-WelcomeMail.ps1in a secure directory (e.g.,C:\Scripts\). - Configuration: Open Task Scheduler on your Exchange Server or Management Tools workstation and create a new Basic Task.
- Trigger: Set the task to run Daily, and use the “Repeat task every” feature to set a frequency of 1 Hour.
- Action: Configure the task to start a program:
- Program/script:
powershell.exe - Arguments:
-ExecutionPolicy Bypass -WindowStyle Hidden -File "C:\Scripts\Send-WelcomeMail.ps1"
- Program/script:
4. Key Implementation Considerations
- SMTP Relay Permissions
For the Send-MailMessage command to function, the server executing the script must be authorized to relay mail. You must configure your Exchange Receive Connector to allow anonymous or authenticated relaying from the script’s source IP address. If you are running the script locally on the Exchange server using 127.0.0.1, ensure the “Default Frontend” connector is set up to accept the traffic.
2. Managing the Initial Run (Avoid “The Blast”)
When you execute the script for the first time, be extremely careful with your $TimeLimit. If it is set to 24 hours, the script will attempt to email every user created in the last day who hasn’t been “stamped” yet.
- Pro-Tip: For the very first run, you may want to manually “stamp” existing users’
CustomAttribute1toWelcomeSentor temporarily set the$MinutesBackto a very small number (e.g., 5 minutes) to test the logic on a single fresh account.
3. Attachment Handling
If you are including a corporate policy or “Org Guide” PDF, ensure the file path is accessible to the account running the scheduled task. You can dynamically attach files using the -Attachments parameter: Send-MailMessage @Params -Attachments "C:\Docs\Rules.pdf"
- Best Practice: Always use the
Test-Pathcommand within your script to verify the file exists before attempting to send the email; this prevents the script from crashing if the document is moved or renamed.
4. Security & Privacy
Since this script handles employee data and dispatches emails to the entire organization, ensure that the folder containing your .ps1 file has restricted NTFS permissions. Only authorized administrators and the System/Service account running the Task Scheduler should have “Read” and “Execute” access.
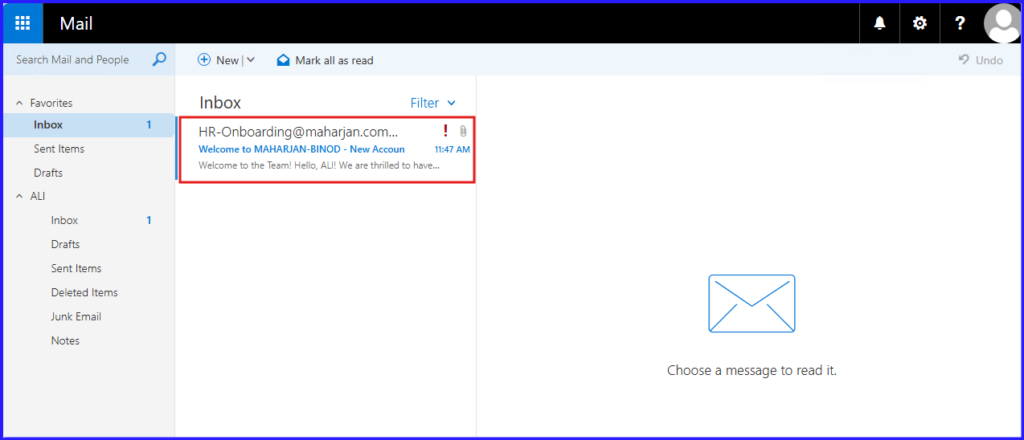
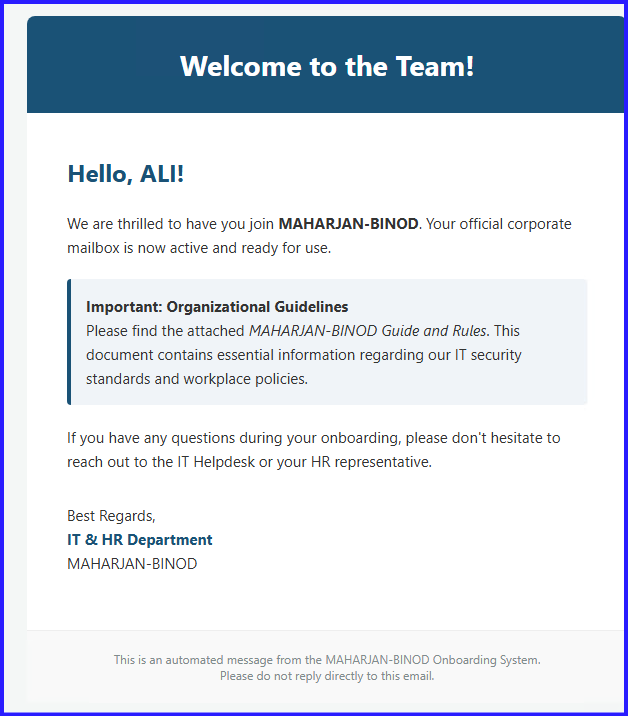
5. The Result: A Professional Welcome Experience
Once the Task Scheduler triggers the script and a new mailbox is detected, the magic happens. The user doesn’t receive a dry, system-generated notification; instead, they are greeted with a branded, modern email that sets the tone for their journey with the company.
Desktop View (Outlook)
The email arrives as a high-priority message. The clean card layout and the “Guide Box” ensure that the employee immediately notices the attached Organizational Rules.
Mobile View
Because we used a responsive max-width: 600px container in our CSS, the email scales perfectly for users checking their new accounts on mobile devices.

Re-run for script again.

In End user login:
Magic happens!
Done.
Conclusion
Automating the “Welcome” email for new mailboxes is more than just a convenience—it’s about creating a professional first impression for your new team members. By leveraging PowerShell and the Windows Task Scheduler, we’ve turned a manual administrative burden into a reliable, “set-it-and-forget-it” system.
This workflow ensures that every user, from their first hour on the job, has the tools and guidelines they need to succeed, while IT stays focused on higher-priority tasks.
Happy Scripting!
Troubleshooting: Common Pitfalls
Even with a perfect script, Exchange environments can be finicky. Here are the most common issues you might encounter:
- The 4.7.0 PRX2 Error: This is a common error when running scripts locally on an Exchange server. It usually indicates a DNS or load-balancing issue within the Frontend/Backend connectors.
- Solution: Ensure your
$SMTPServeris set to127.0.0.1. This forces the script to talk directly to the local relay rather than jumping through external DNS loops.
- Solution: Ensure your
- Execution Policy Block: If your task fails to start, PowerShell might be blocking the script due to security policies.
- Solution: Always use the
-ExecutionPolicy Bypassflag in your Task Scheduler arguments to allow the script to run without manual intervention.
- Solution: Always use the
- Module Not Found: If you see an error stating
Get-Mailboxis not recognized, the Exchange Snapin failed to load.- Solution: Verify that the script is running on a machine with the Exchange Management Tools installed and that the
Add-PSSnapincommand at the top of the script points to the correct version (e.g., E2010 vs. E2013+).
- Solution: Verify that the script is running on a machine with the Exchange Management Tools installed and that the
- Permissions (Access Denied): The script might fail to update
CustomAttribute1.- Solution: Ensure the service account running the Task Scheduler is a member of the Recipient Management or Organization Management role groups in Exchange.