📦 Managing Updates & Approval Rules in WSUS
Approve, decline, and automate updates – taking control of your patch lifecycle
In the previous post, we configured Group Policy to point clients to your WSUS server. Now that clients are reporting in, it’s time to do what WSUS does best: manage and deploy updates.
This post covers the complete update lifecycle in WSUS — from reviewing available updates, to approving and declining them, to setting deadlines and creating automatic approval rules that save you countless hours of manual work.
Understanding WSUS Approval States
Before we dive into the process, let’s clarify the four approval states in WSUS. Each update in your catalog can have one of these states for each computer group:
| State | Icon | What It Means | When to Use |
|---|---|---|---|
| Approved | ✅ | Clients in the group will download and install the update. | You’ve tested the update and it’s safe for deployment. |
| Declined | ❌ | Clients will never receive this update — it’s permanently blocked. | Update is obsolete, superseded, or contains known issues. |
| Not Approved | ⏳ | Default state. No action taken; clients ignore the update. | You’re still reviewing or testing the update. |
| Installed | 📌 | Update is already installed on some or all clients in the group. | Auto‑detected by WSUS — informs you that the update is no longer needed for compliant machines. |
Step 1: Navigate the WSUS Administration Console
Open the WSUS Administration Console on your WSUS server (via Server Manager → Tools → Windows Server Update Services).
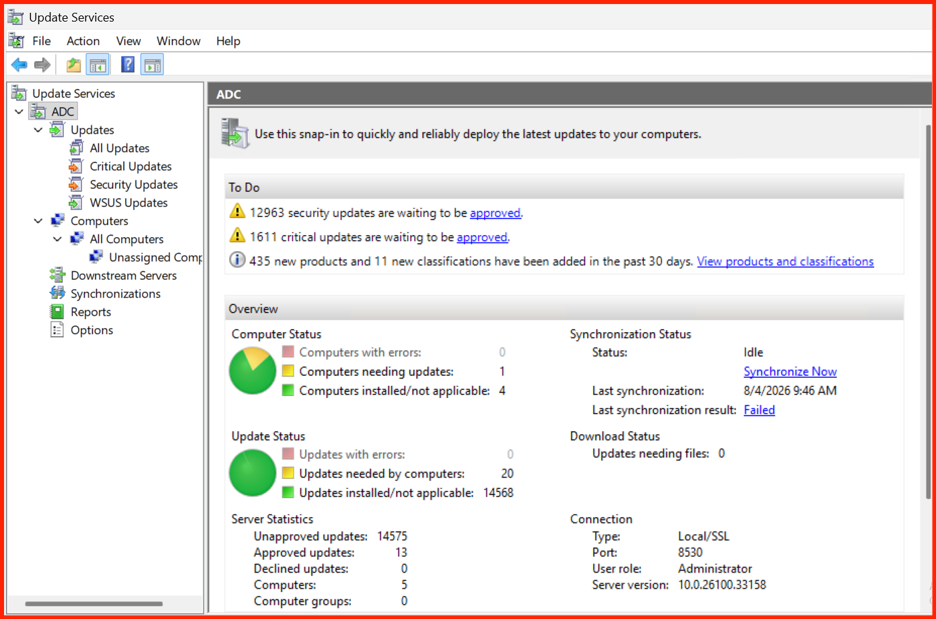
In the console tree (left pane), expand your WSUS server. You’ll see several key nodes:
- Updates: All available updates, searchable and filterable.
- Computers: All clients reporting to your WSUS server, grouped by computer group.
- Synchronizations: History of syncs with Microsoft Update.
- Reports: Pre‑built reports for update compliance.
- Options: Server settings, including automatic approval rules.
Step 2: Review Available Updates
Click on the Updates node. You’ll see a list of all updates synced from Microsoft Update.
Filter Updates for Better Management
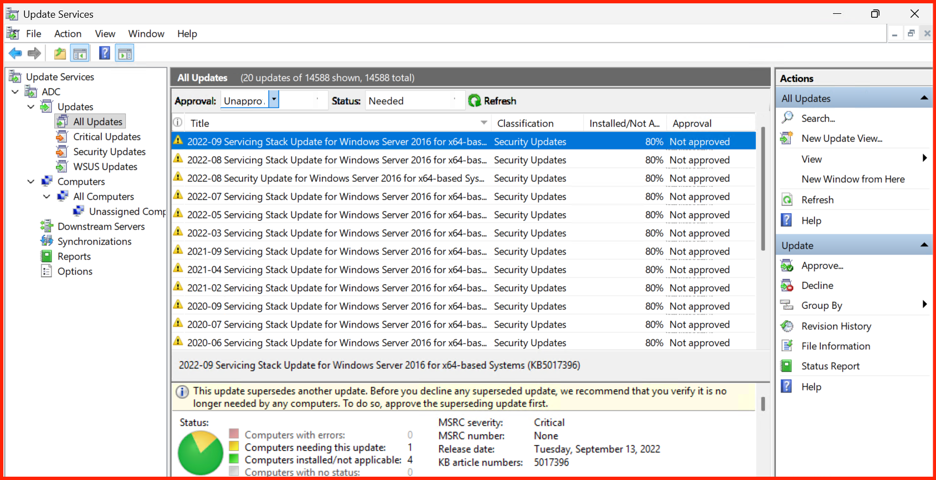
With hundreds or thousands of updates available, filtering is essential. Use the Approval dropdown at the top of the update list to view:
- Any except approved: Shows all updates that need review (most useful).
- Approved: Updates already approved for deployment.
- Declined: Updates you’ve chosen to block.
Understand Update Properties
Double‑click any update to review its properties. Key information includes:
- Title: What the update does.
- Classification: Critical, Security, Optional, etc.
- Products: Which operating systems/applications it applies to.
- KB Article: Link to Microsoft’s documentation.
- Supersedence: Whether this update replaces older updates.
- Release Date: When Microsoft published it.

Step 3: Approve Updates
Once you’ve reviewed an update and determined it’s safe, you can approve it for deployment.
Select Updates and Launch the Approval Wizard
In the Updates list, check the box next to the update(s) you want to approve. Right‑click and select Approve, or click Approve in the action pane on the right.

Choose the Target Computer Group
The Approval Wizard will ask you to select which computer group(s) should receive the update. This is where the power of phased rollouts shines:
- WINDOWS 11 OS Group: Approve first — 5–10 machines.
- WINDOWS SERVER 2016 Group: Approve after 3–5 days with no issues.
- WINDOWS SERVER 2025 Group: Approve after 7–14 days of testing.

Set a Deadline (Optional but Recommended)
A deadline forces the update to install by a specific date and time, even if the client’s automatic update schedule would otherwise delay it. This is crucial for security updates where compliance is time‑sensitive.
- No deadline: Follows the client’s normal automatic update schedule.
- Specific date/time: Forces installation by the deadline (e.g., 48 hours after approval).

Add an Approval Note (Optional)
Adding a note helps your team understand why an update was approved or declined — especially useful when multiple administrators manage WSUS.

Review and Complete the Approval
Review your selections and click Approve. The updates will now be deployed to clients in the selected groups according to their automatic update schedules (or deadlines, if set).

⚡ Automatic Approval Rules (Game Changer)
Manually approving every update is time‑consuming and error‑prone. Automatic Approval Rules save you hours by automatically approving updates that meet specific criteria.
Navigate to Automatic Approvals
In the WSUS console, click on Options (at the bottom of the left pane), then double‑click Automatic Approvals.

Create a New Rule
Click New Rule. You’ll build a rule using three components:
- When to run: On a schedule (e.g., daily after sync) or manually.
- Which updates: Criteria based on classification, product, title, etc.
- What to do: Approve for specific computer groups, set deadlines.

Example Rule: Auto‑Approve Critical Security Updates
Name: “Auto‑Approve Critical & Security Updates for Production”
When: Run after each synchronization
Criteria:
- Classification: Critical Updates and Security Updates
- Product: Windows Server 2025 and Windows 11 (customize for your environment)

Common Automatic Approval Rules
| Rule Name | Classification | Target Group | Deadline |
|---|---|---|---|
| Test – All Updates | All classifications | Test | No deadline |
| Prod – Critical & Security | Critical, Security | Production | 5 days |
| Prod – Driver Updates | Driver Sets | Pilot only | 7 days |
| Prod – Definition Updates | Definition Updates | All groups | 1 day |
Declining Updates: When and Why
Not every update is worth deploying. Declining an update removes it from the view and prevents clients from ever seeing it. Common reasons to decline:
- Superseded updates: A newer update covers the same issue.
- Known issues: Microsoft has acknowledged problems with the update.
- Out of scope: The update doesn’t apply to your environment (e.g., updates for a product you don’t use).
To decline an update, select it in the Updates list, right‑click, and choose Decline.
Monitoring Update Deployment
After approving updates, it’s important to monitor their progress. WSUS provides two key ways to check deployment status:
Option 1: View Update Status in the Console
Select an approved update, and look at the Status pane at the bottom. You’ll see:
- Needed: Clients that require this update.
- Installed: Clients that have successfully installed it.
- Not applicable: Clients that don’t need the update.

Option 2: Generate a Status Report
For a more detailed view, click on Reports and run a Status of Updates report. This gives you a printer‑friendly view of update compliance across your entire environment.

📋 Best Practices for Update Management
- Follow the “Test → Pilot → Production” model: Never approve updates directly for production. Use computer groups to stage your rollouts.
- Set deadlines only when necessary: For critical security updates, deadlines ensure timely compliance. For optional updates, let them follow the normal schedule.
- Review automatic approval rules quarterly: Products and classifications change over time. Ensure your rules still match your environment.
- Decline superseded updates: WSUS doesn’t automatically clean them up. Declining them reduces console clutter and speeds up reporting.
- Document your approval decisions: Use the “Note” field when approving or declining updates — future you (and your team) will thank you.
- Monitor failure rates: If a significant number of clients fail to install an update, investigate before rolling out to additional groups.
📋 Summary
- ✅ Understood the four WSUS approval states: Approved, Declined, Not Approved, Installed.
- ✅ Reviewed available updates and filtered for efficient management.
- ✅ Approved updates for specific computer groups (Test → Pilot → Production).
- ✅ Created automatic approval rules to save time and ensure consistency.
- ✅ Learned when and how to decline obsolete or problematic updates.
- ✅ Monitored deployment progress using the console and reports.
➡️ What’s Next?
With approvals and rules in place, the next post will cover Monitoring WSUS Reports and Client Status
— diving deep into compliance reporting, troubleshooting client issues, and using WSUS’s built‑in reporting tools.