🧩 Configuring Group Policy for WSUS Clients
Point your domain‑joined devices to your WSUS server and control update behaviour with precision
In the previous post, we installed and configured WSUS on Windows Server 2025. But a WSUS server with no clients is just a digital ghost town. The next critical step is to tell your Windows devices where to find updates — and that’s where Group Policy comes in.
This post covers everything you need to configure Group Policy Objects (GPOs) to point domain‑joined clients to your WSUS server, define update schedules, and enforce consistent patching behaviour across your entire Windows estate.
Prerequisites
Before you begin, ensure you have:
- Active Directory — a domain environment with at least one domain controller.
- Group Policy Management Console (GPMC) — installed on a domain‑joined management machine (or the domain controller itself).
- WSUS Server — installed and configured (from the previous post).
- WSUS Server URL — the address clients will use to reach WSUS (e.g.,
http://adc.maharjan.np:8530). - Domain Admin or equivalent — permissions to create and link GPOs.
- Client‑side targeting — if you plan to use WSUS computer groups, decide on a naming convention (we’ll cover this).
Step 1: Create a New WSUS Group Policy Object
While you can add WSUS settings to an existing GPO (like your default domain policy), it’s best practice to create a dedicated WSUS GPO. This makes it easier to test, troubleshoot, and eventually migrate away from WSUS without affecting other policies.
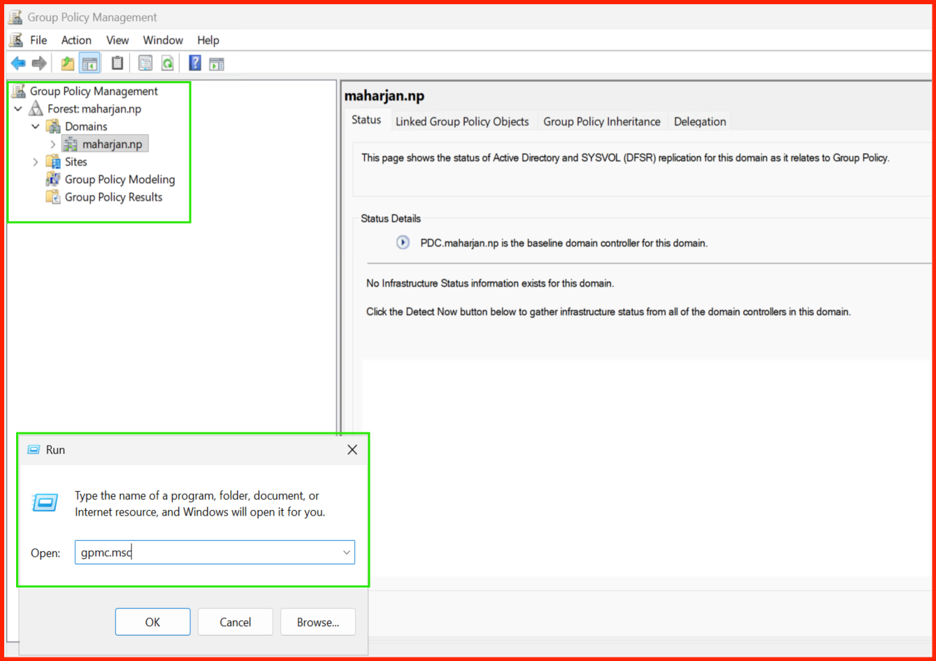
Open Group Policy Management Console
On your domain controller (or a machine with RSAT tools installed), open Group Policy Management Console.
Create a New GPO
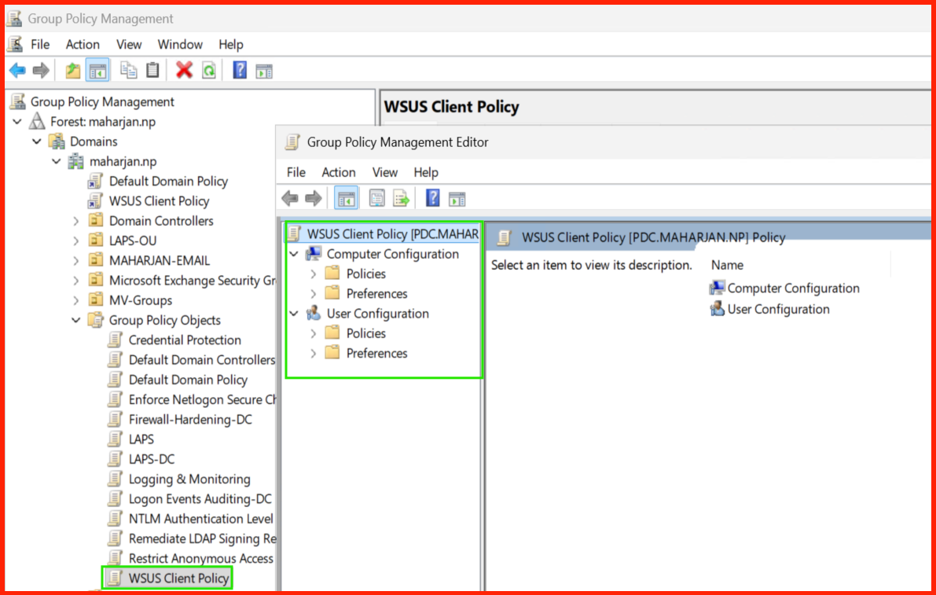
Navigate to your domain (e.g., maharjan.np), right‑click Group Policy Objects,
and select New.
Give your GPO a descriptive name — e.g., “WSUS Client Policy”.
Step 2: Configure the WSUS Policies
The WSUS settings are located under Computer Configuration → Policies → Administrative Templates → Windows Components → Windows Update.
Right‑click your new GPO and select Edit. Navigate to the path above and configure the following policies:
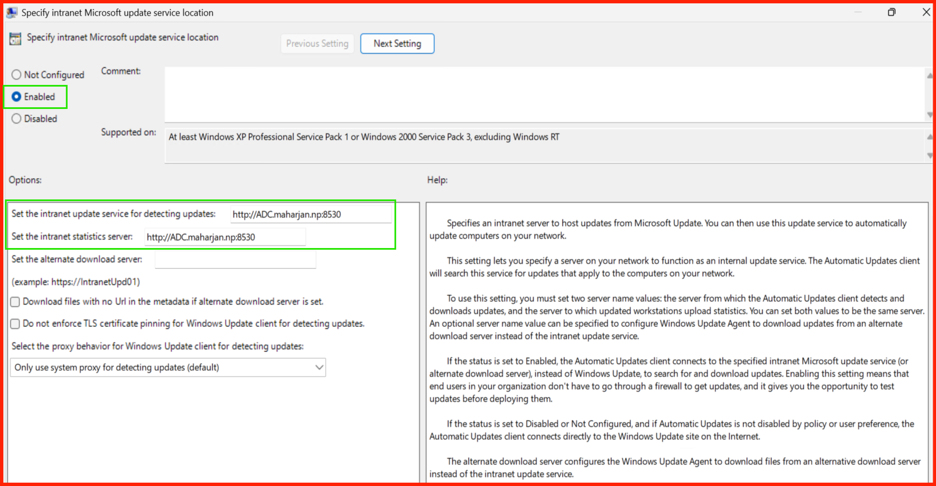
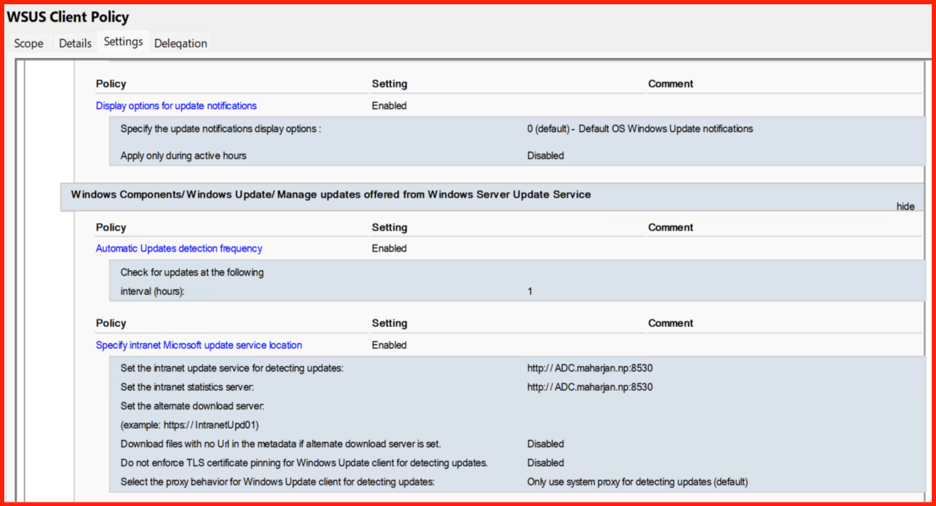
Specify intranet Microsoft update service location
This is the most important setting. It tells clients where to find updates.
- Setting:
Specify intranet Microsoft update service location - State:
Enabled - Value 1:
http://adc.maharjan.np:8530(replace with your WSUS server’s FQDN or IP) - Value 2:
http://adc.maharjan.np:8530(same for the intranet statistics server)
For example: http://adc.maharjan.np:8530
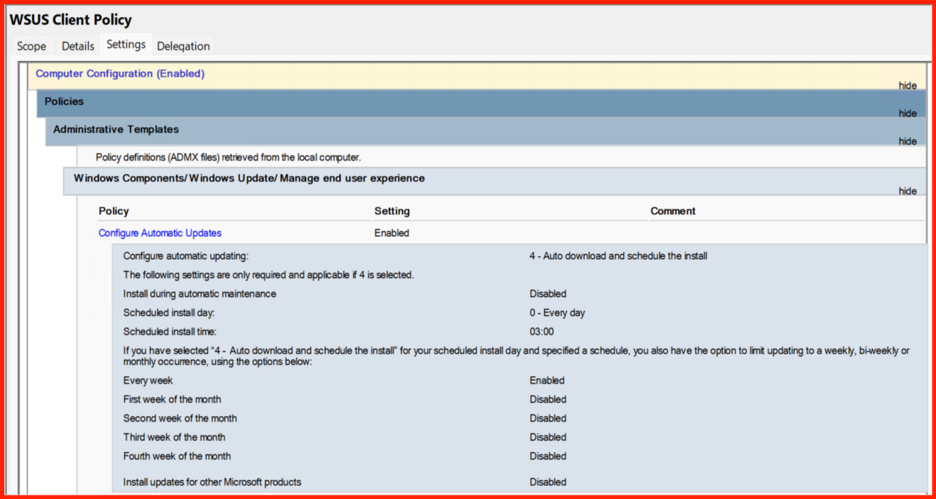
Configure Automatic Updates
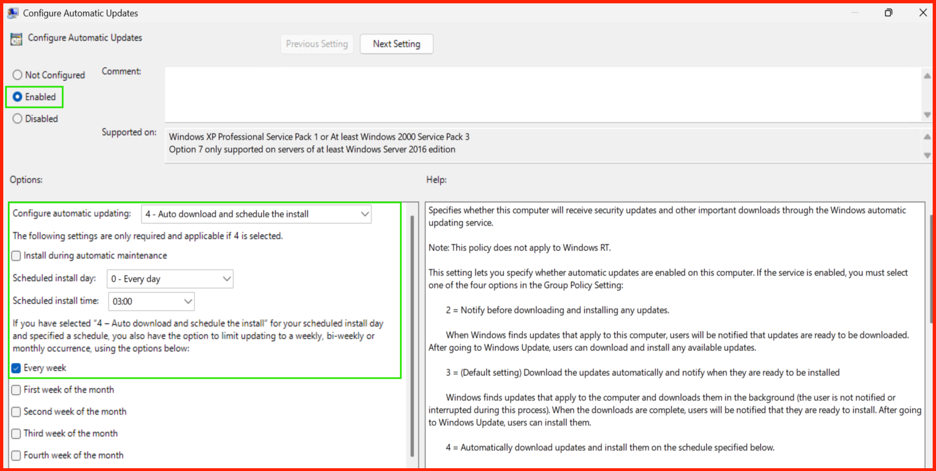
This policy controls how updates are installed on clients.
- Setting:
Configure Automatic Updates - State:
Enabled - Options:
- Configure automatic updating:
4 - Auto download and schedule the install(recommended for most environments). - Scheduled install day:
0 - Every dayor a specific day (e.g., Wednesday). - Scheduled install time:
03:00(or your preferred maintenance window).
- Configure automatic updating:
Enable client‑side targeting (optional but recommended)
This policy allows clients to automatically place themselves into WSUS computer groups. This is incredibly useful for phased rollouts (e.g., “Test”, “Pilot”, “Production”).
- Setting:
Enable client‑side targeting - State:
Enabled - Target group name for this computer:
Workstations - Test(or any group name you’ve created in WSUS).
Important: The group name you enter here must exactly match a computer group you’ve created in the WSUS Administration Console.

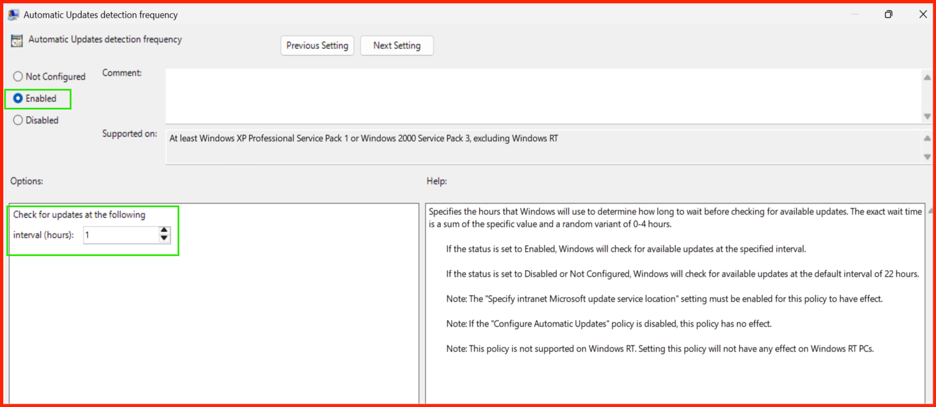
Set the Automatic Update detection frequency (optional)
This controls how often clients check for new updates (default is every 22 hours). You can adjust this if you need faster detection.
- Setting:
Automatic Update detection frequency - State:
Enabled - Value:
6(hours — minimum allowed is 1 hour; 6–12 is typical).
Optional Policies to Consider
| Policy | Recommended Setting | Why |
|---|---|---|
| No auto‑restart with logged‑on users | Enabled (for workstations) |
Prevents forced reboots while users are actively working. |
| Reschedule Automatic Updates installations | Enabled (e.g., wait 5 minutes) |
Retries missed installations after a system startup. |
| Allow non‑administrators to receive update notifications | Enabled (for user environments) |
Lets standard users see update notifications (useful for user‑facing systems). |
| Remove access to Windows Update | Enabled (optional) |
Prevents users from checking for updates directly with Microsoft Update — forces all traffic through WSUS. |
Step 3: Link the GPO to the Appropriate OU
Now that your GPO is configured, you need to apply it to the computers that should receive the WSUS policy.
Select the Target OU
In the Group Policy Management Console, locate the Organizational Unit (OU) that contains your target computers
(e.g., Workstations or Servers). Right‑click the OU and select Link an Existing GPO.
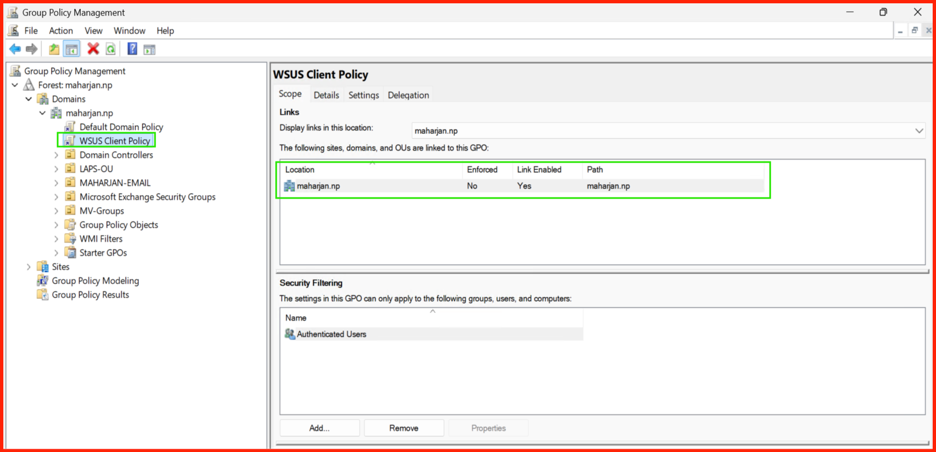
Verify the Link
Ensure the GPO appears under the Linked Group Policy Objects tab of the OU. You can adjust the link order if you have multiple GPOs — WSUS policies should not conflict with other update‑related settings.
Step 4: Force Group Policy & Verify Clients in WSUS
Group Policy refresh happens every 90–120 minutes by default, but for testing, you can force it on a client machine.
Force GPUpdate on a Client
Open an elevated Command Prompt or PowerShell on a domain‑joined client and run:
gpupdate /forceThis forces the client to re‑apply all group policies, including your new WSUS settings.

Trigger the First WSUS Detection
Windows clients automatically check for updates within 22 hours of policy application. To speed this up, run the following command to force an immediate update detection:
wuauclt /detectnow /reportnow
Note: On newer Windows versions (Windows 10 21H2+, Windows 11, Server 2025), you can also use usoclient startscan.
wuauclt /detectnow, wait 5–10 minutes and then check the WSUS console. If the client appears, it’s working!
Verify the Client in the WSUS Console
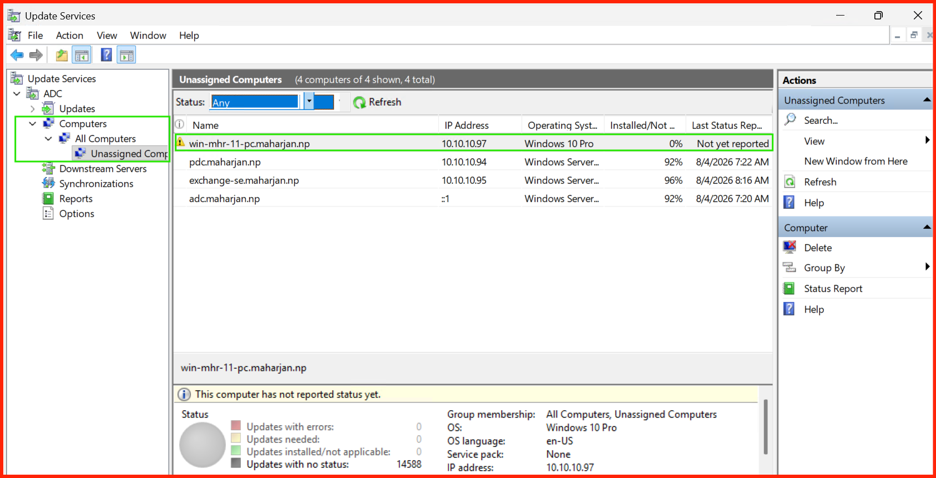
Open the WSUS Administration Console on your WSUS server. Under Computers, you should see your client(s) appear. If you used client‑side targeting, they’ll automatically appear in the correct group.
🛠️ Troubleshooting: Clients Not Appearing?
If your clients don’t show up in the WSUS console after 30–60 minutes, check these common issues:
- Firewall Blocking Ports: Ensure TCP 8530 is open between clients and the WSUS server.
-
DNS Resolution: The WSUS server FQDN must resolve correctly on clients. Test with
nslookup wsus-server.domain.local. -
GPO Not Applied: Run
gpresult /ron the client to confirm the WSUS GPO is listed under “Applied Group Policy Objects”. - Windows Update Service: Ensure the Windows Update service is running on the client.
-
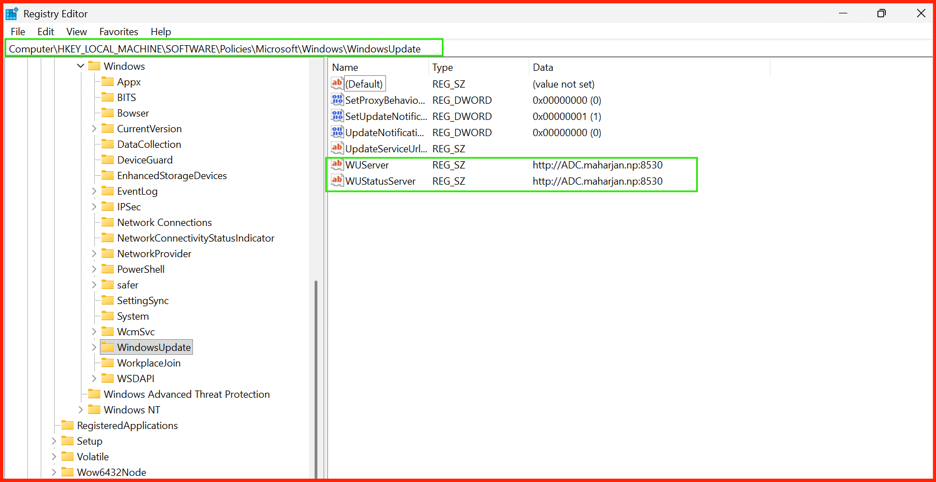
Registry Check: Verify the WSUS URL is set in the registry:
HKLM\Software\Policies\Microsoft\Windows\WindowsUpdate- Key:
WUServerandWUStatusServershould match your WSUS URL.
📋 Summary
- ✅ Created a dedicated WSUS GPO.
- ✅ Configured the WSUS server URL (
http://WSUS-SERVER:8530). - ✅ Set automatic update behavior and schedule.
- ✅ Enabled client‑side targeting (if used).
- ✅ Linked the GPO to the appropriate OU.
- ✅ Verified clients reporting to the WSUS console.
➡️ What’s Next?
With clients now reporting to WSUS, the next post will cover Managing Updates & Approval Rules
— approving updates, creating automatic approval rules, and deploying patches to your client groups.