Building a Secure 2-Tier Architecture
A Personal Guide to VNet Planning and VM Deployment
Introduction
Welcome to the first post of my Azure series! In this guide, I’m moving beyond the “Quick Create” button. We are designing a production-ready environment together. I’ll show you how I build a 2-Tier architecture—separating the application from the database—to ensure our data stays isolated and secure within a custom Virtual Network (VNet).
Architecture Diagram
Visualizing the flow of traffic is crucial for cloud security. Below is the blueprint I’ve designed for our environment:
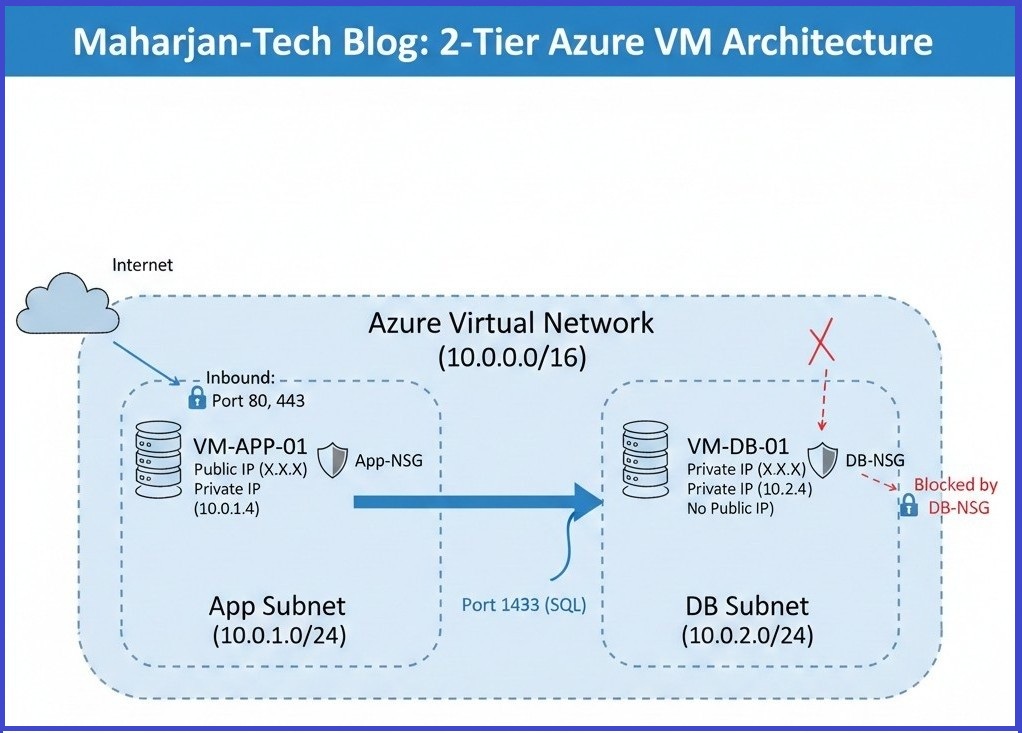
Figure 1: My logical flow between the App Subnet and the isolated DB Subnet
Key Components
VNet & Subnets
This is my private network space. I use subnets to physically separate my application logic from my sensitive data storage.
Network Security Groups (NSG)
These are my virtual firewalls. I use them to define strict rules, ensuring only my App VM can talk to my Database.
Virtual Machines
For this lab, I chose B2s sizes. They are great for my budget while providing enough power for our testing needs.
My Network Planning Table
Here is how I carved out the IP addresses for this project:
| Tier | Subnet Name | CIDR Block | Access Level |
|---|---|---|---|
| Web/App | snet-web-prod | 10.0.1.0/24 | Public (HTTP/S) |
| Database | snet-db-prod | 10.0.2.0/24 | Private Only |
Step-by-Step Configuration
Creating the Virtual Network
Based on my network planning, I defined the VNet address space as 10.0.0.0/16. I then created both subnets to match the exact configurations from my planning table.
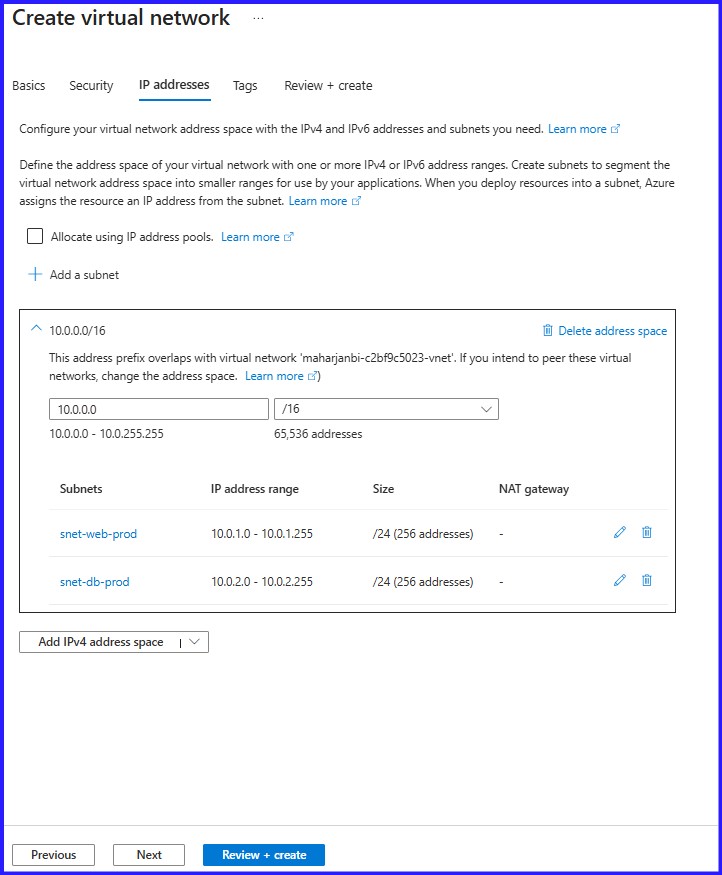 Figure 2: VNET Address Space with two Subnets
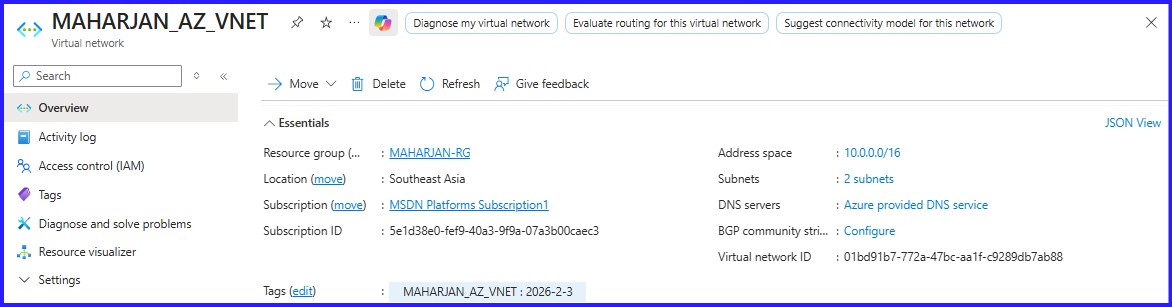 Figure 3: VNET Created Successfully
Deploying the Virtual Machines
Next, I moved on to compute. I deployed MAHARJAN-WEB-APP into the web subnet and placed MAHARJAN-DATABASE-APP within the database subnet. A crucial security practice I always follow: I ensured the Database VM was provisioned with No Public IP, keeping it completely shielded from the outside world.
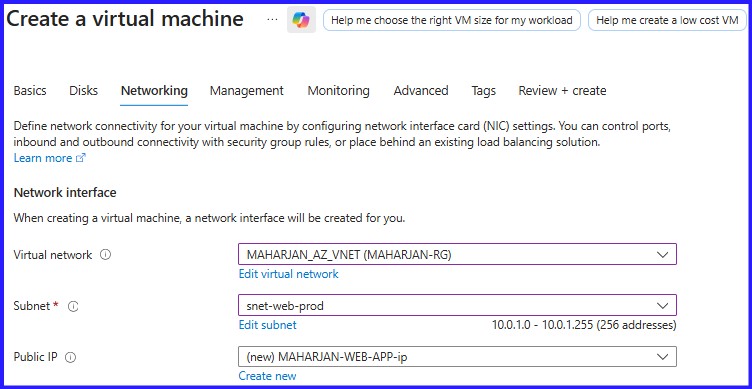 Figure 4: VM-Web-Application choosing the Web Subnet.
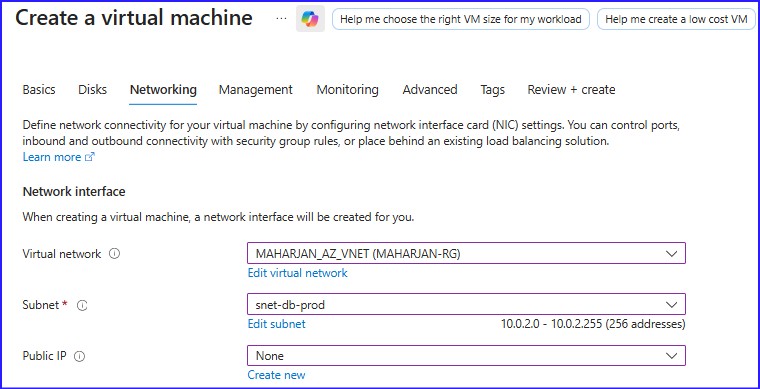 Figure 5: VM-Database choosing the Database Subnet
Configuring Public Access
Now that my VMs are deployed, I need to make the web application accessible while keeping the backend secure. To do this, I assign a Static Public IP to MAHARJAN-WEB-APP. This gives my application a consistent address on the internet so users can find it.
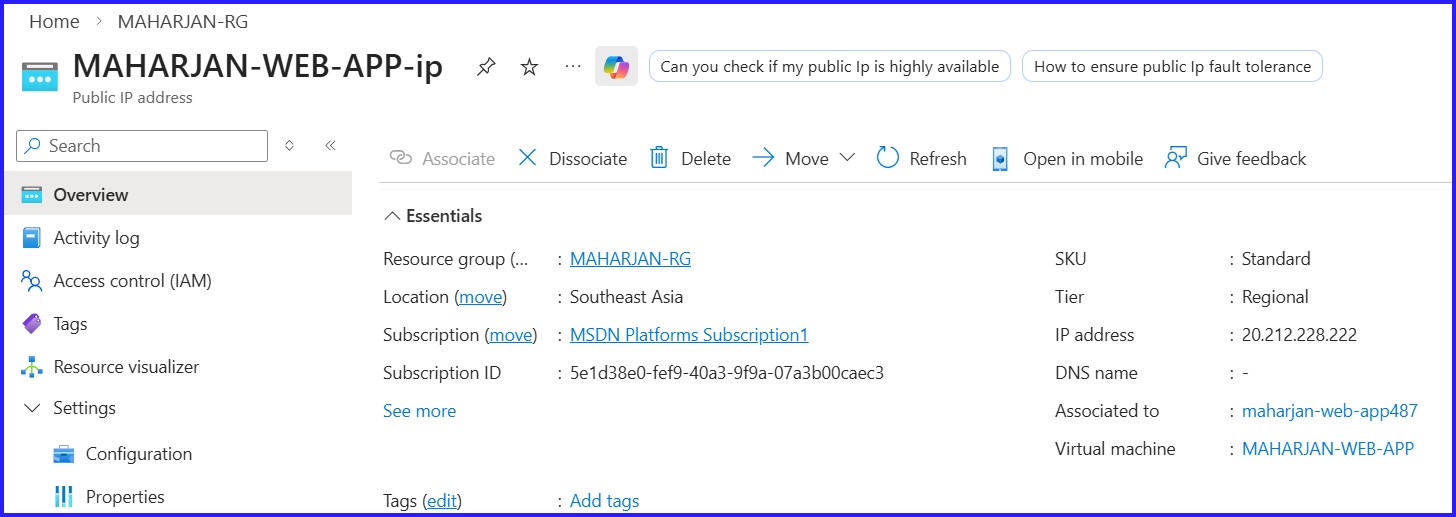 Figure 6: Created Static Public IP Address.
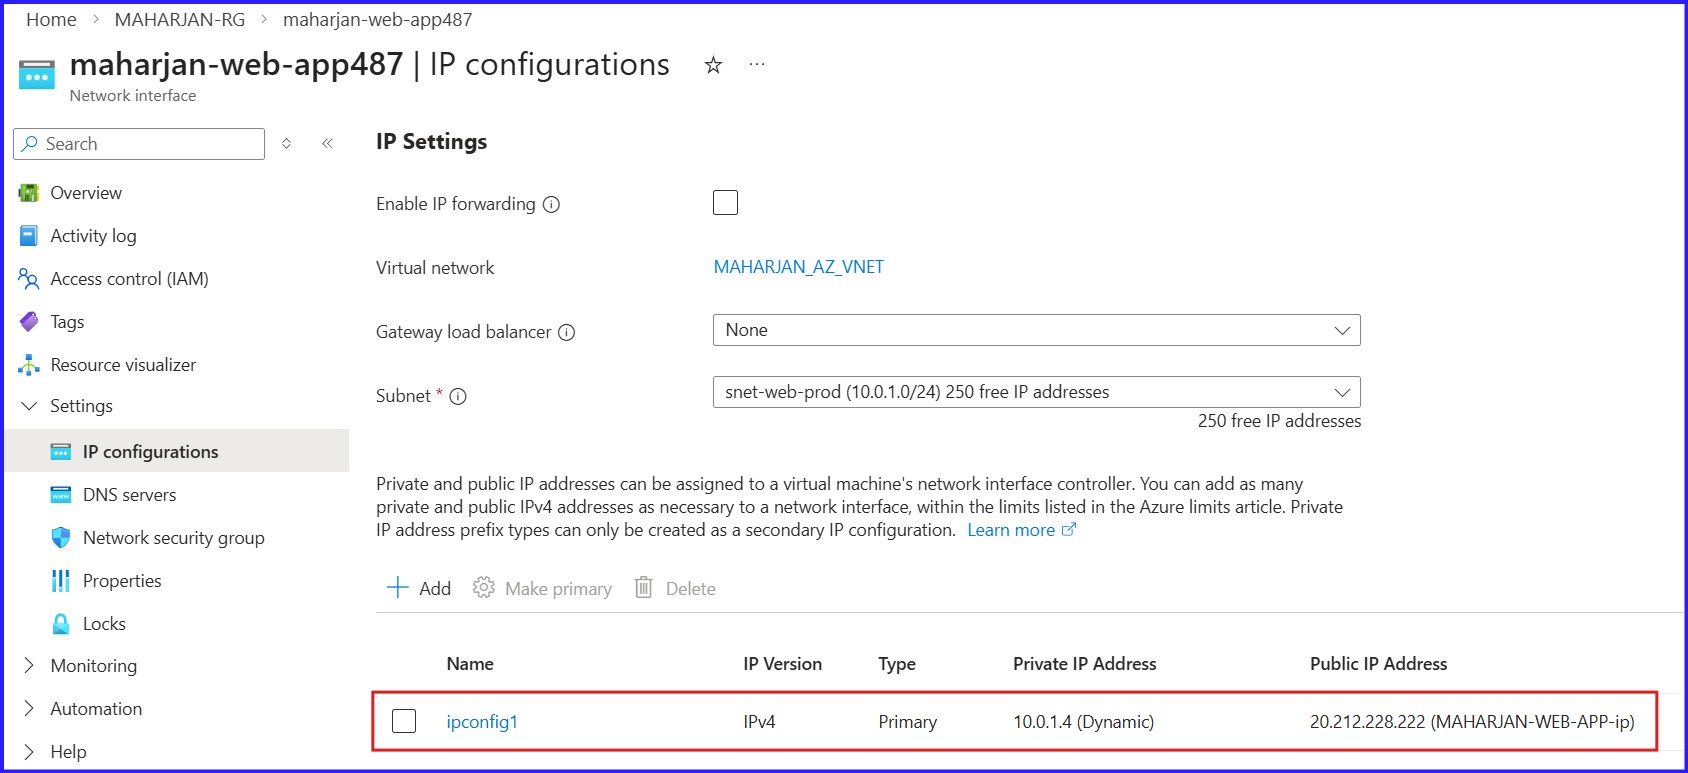 Figure 7: Assigning Public IP Address to Web-App NIC Address.
However, simply having a Public IP won’t be enough—I will need to strictly control the traffic. This is where Network Security Groups (NSGs) will come into play.
In the upcoming steps, here is how I will set them up:
- For the Web Tier: I will create an inbound rule in MAHARJAN_WEBAPP_NSG to allow traffic on Port 80 (HTTP) and Port 443 (HTTPS). This will allow me to host my web service while blocking all other unnecessary ports.
- For the Database Tier: This will be my ‘No-Go’ zone for the public. I will ensure MAHARJAN-DATABASE-APP has No Public IP. I will then configure the database NSG to allow traffic on Port 1433 (SQL), but I will restrict the source specifically to the IP range of my Web Subnet.
By following this workflow, I will create a ‘one-way street’ where the world can talk to my web app, but only my web app will be able to talk to my database.
Securing the Tiers with NSGs
With my VMs running, I need to ensure they are properly protected. By default, Azure allows too much communication; my goal is to lock down the Database so it only listens to my Application.
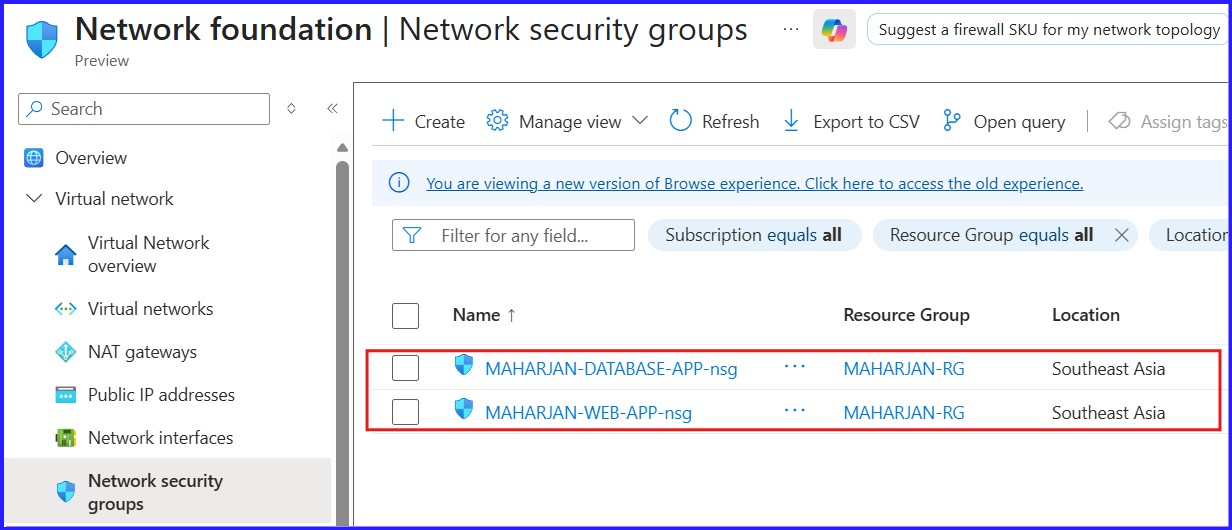 Figure 8: Created Network Security Groups (NSGs) for Webapp & Database.
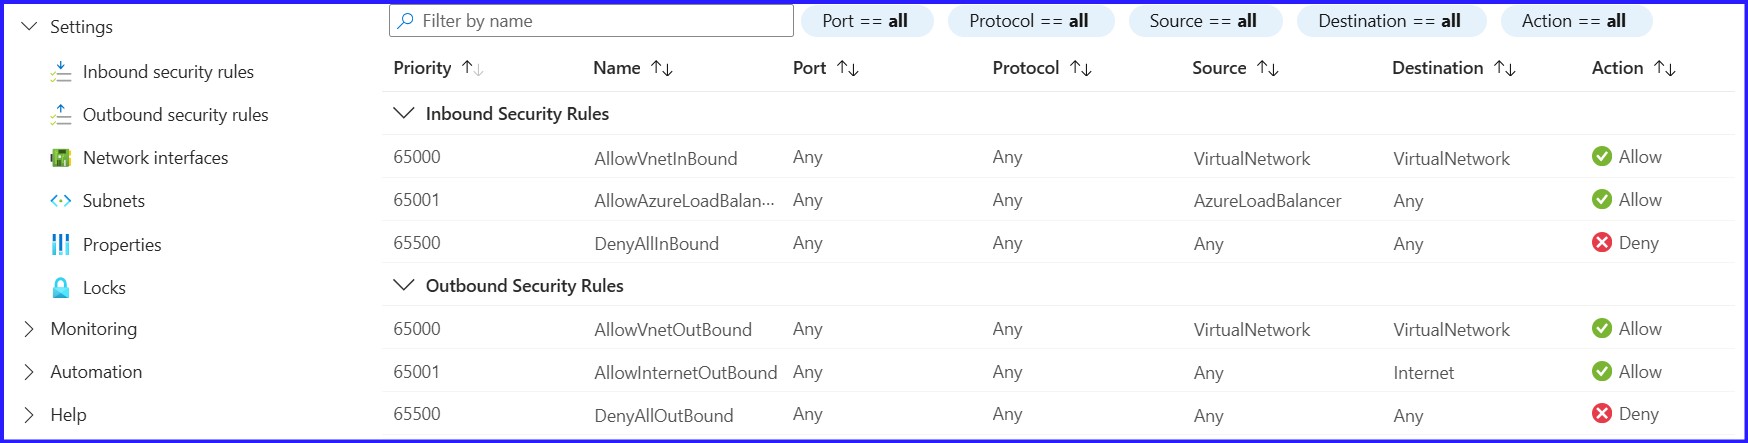 Figure 9: By Default, Inbound & Outbound Security Rules.
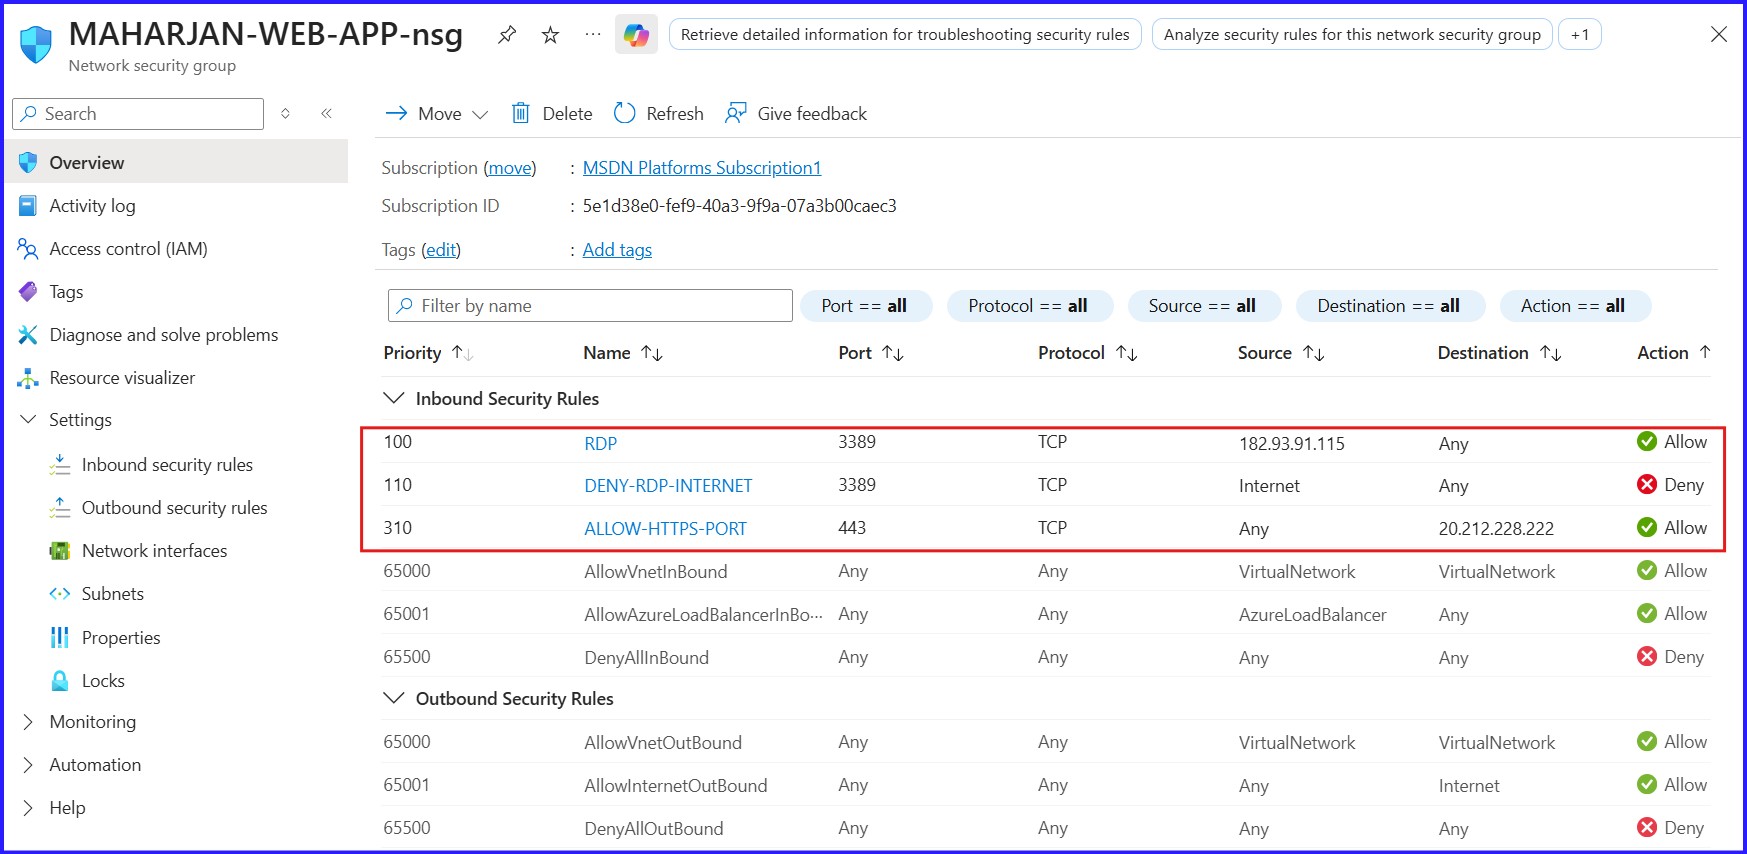 Figure 10: For WebApp-NSG, Inbound Security Rules.
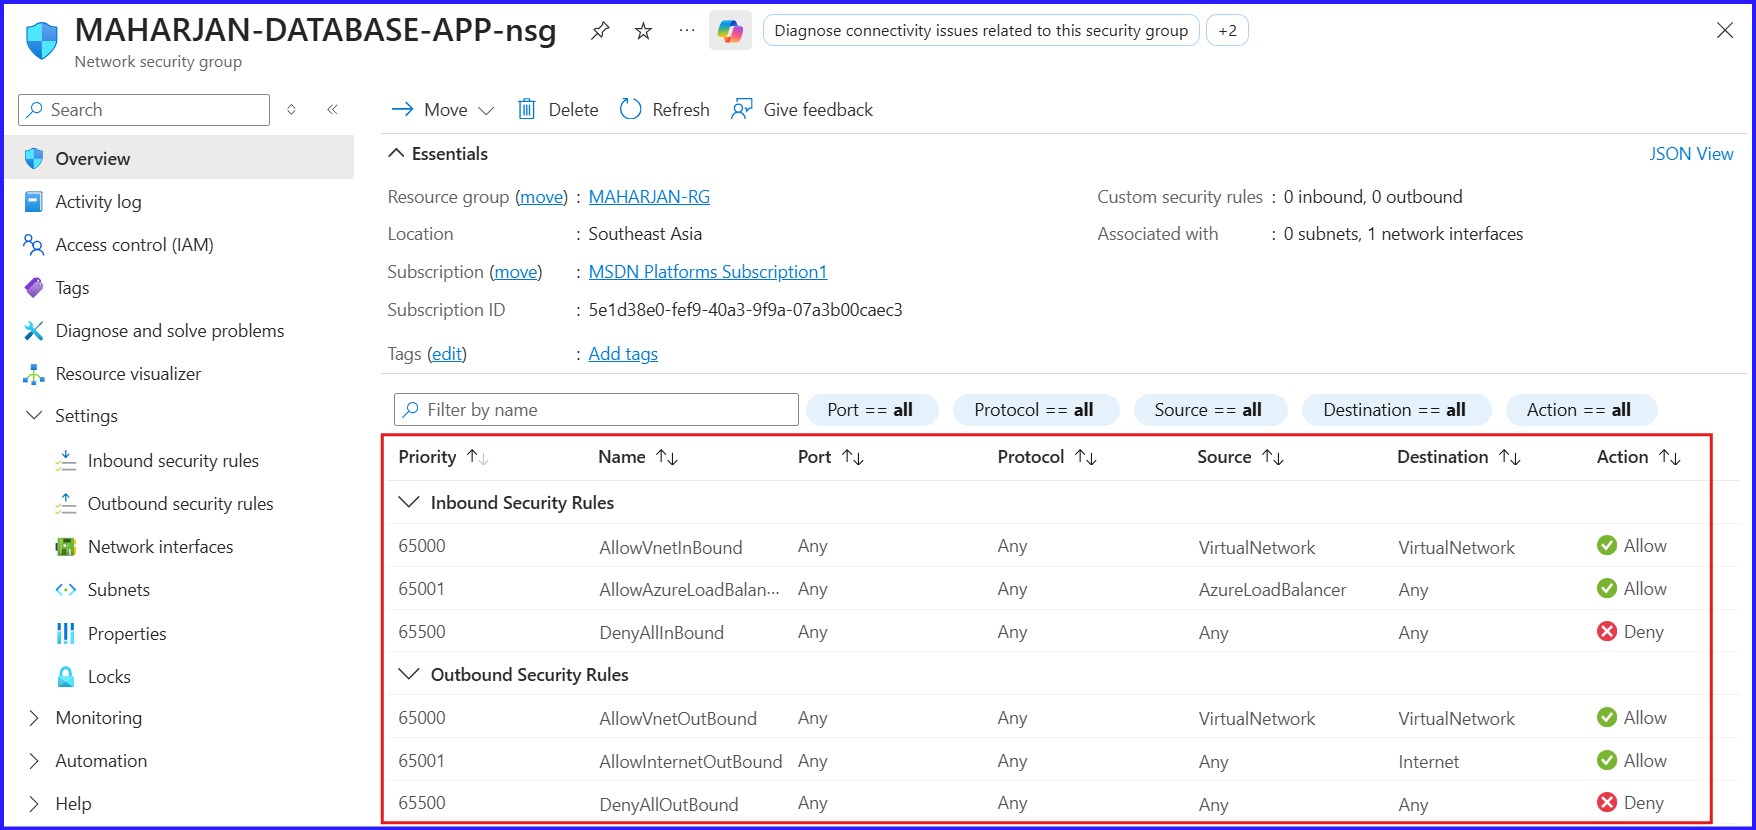 Figure 11: For DatabaseApp-NSG, Inbound & Outbound Security Rules.
I have secured the web server by allowing HTTPS but blocking public RDP, despite it having a public IP. The database server remains private with no public IP and is only accessible via RDP through the web server. Consequently, no additional inbound security rules were needed for the database instance.
Testing My Architecture
I never consider a lab complete until I’ve verified the connection. I logged into my App VM and ran this PowerShell command to see if it could “reach” the database:
TcpTestSucceeded : True
It works! The application can talk to the database, but the database remains hidden from the public internet.
Configure Private DNS
Creating the Private DNS Zone
Based on my network planning, I defined the VNet address space as 10.0.0.0/16. I then created both subnets to match the exact configurations from my planning table.
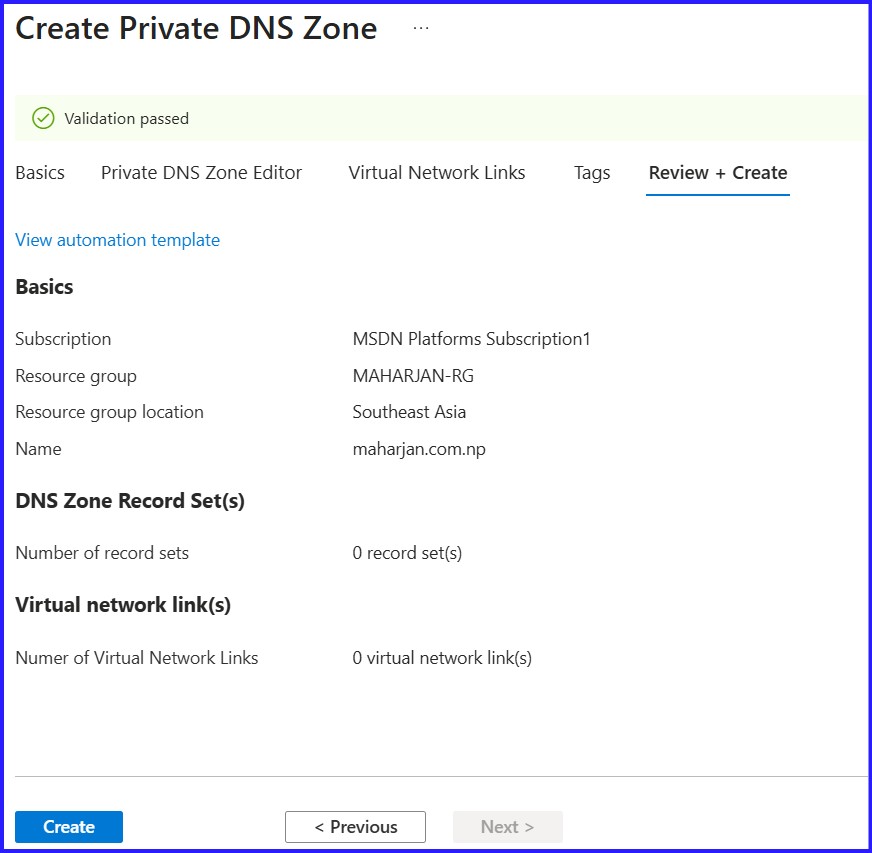 Figure 12: Creating Private DNS Zone
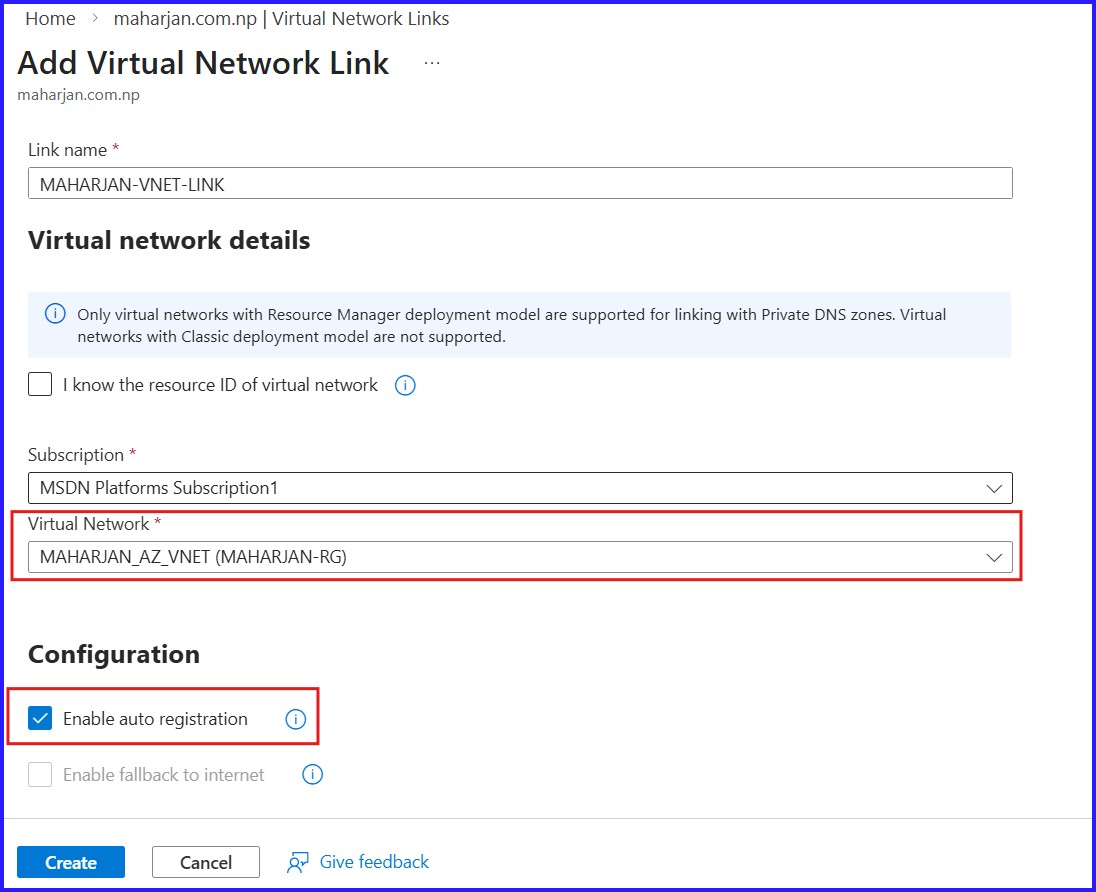
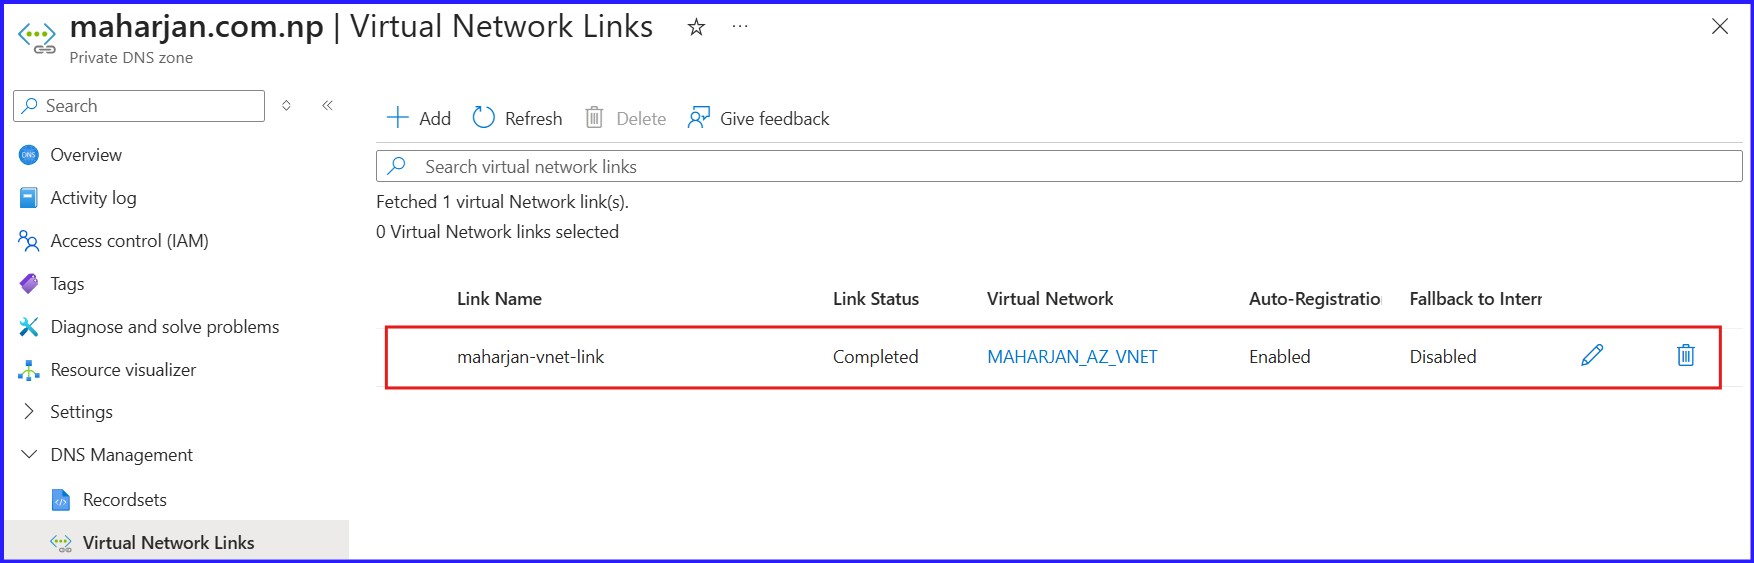 Figure 13: Creating Virtual Network Links
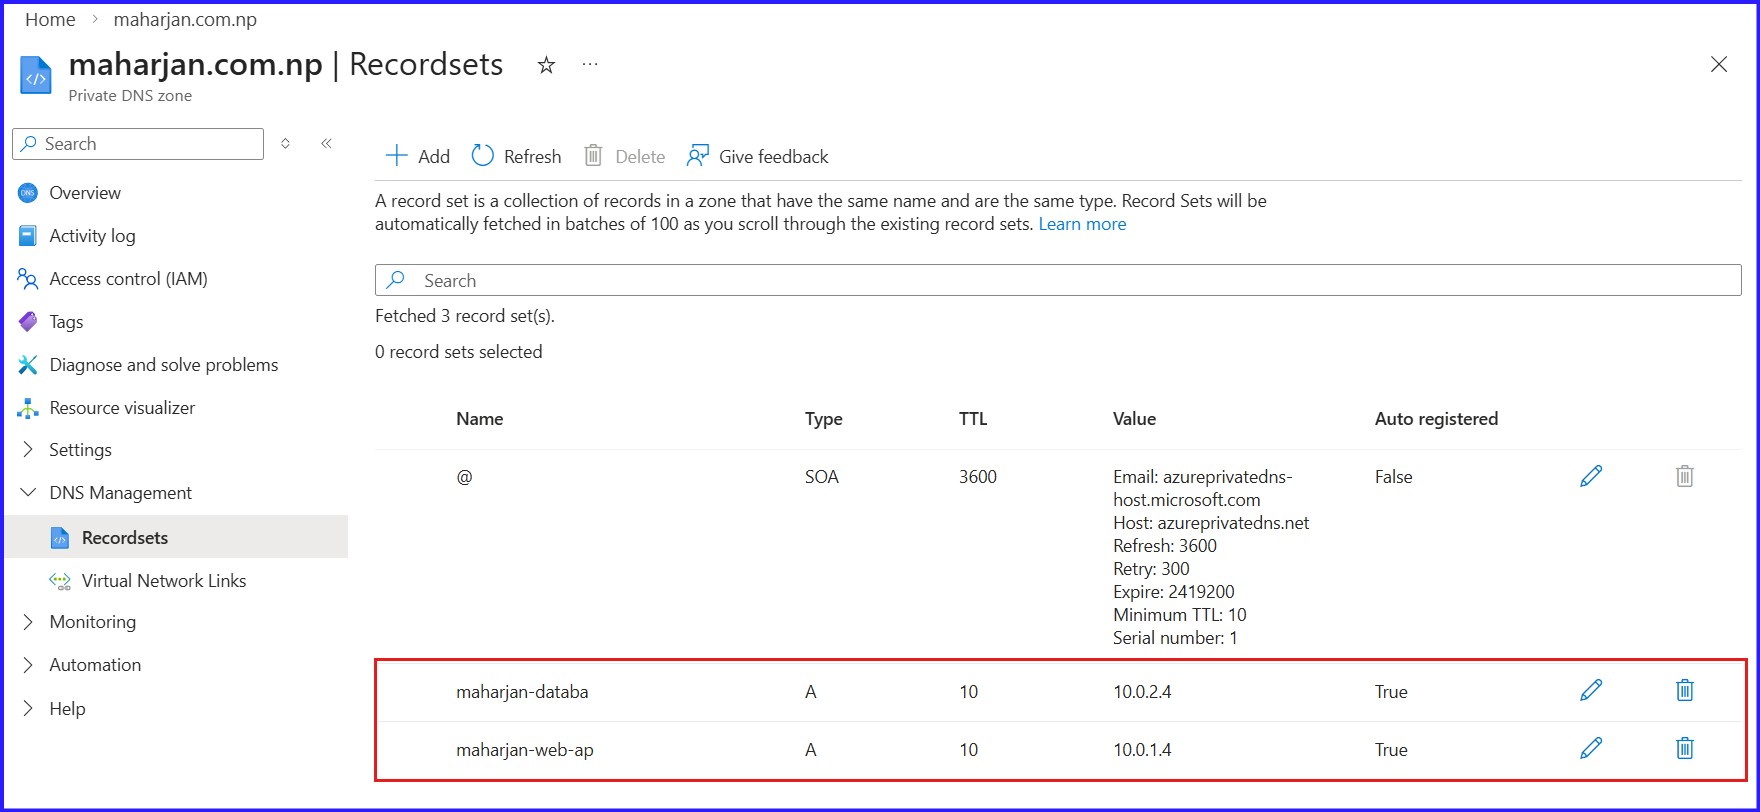 Figure 14: Reflecting DNS Records of Virtual Machine.
Connect to a VM to test the Name Resolution
Download the RDP File and connect the VM. After login, Run the below command to test:
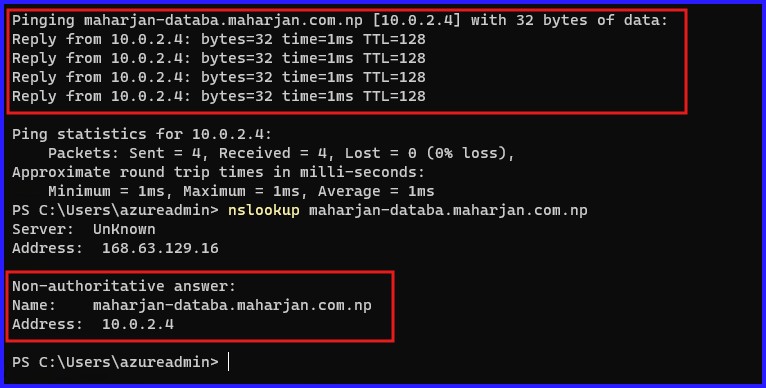 Figure 15: Verify DNS Resolution by Nslookup.
Conclusion & Key Takeaways
Building this 2-tier architecture has demonstrated that cloud security isn’t just about blocking ports—it’s about intentional design. By isolating the database in a private subnet and using the Web-App server as a controlled gateway, we’ve significantly reduced the attack surface of our environment.
- Security by Isolation: We ensured the Database VM remains invisible to the public internet by omitting a Public IP and utilizing a private subnet.
- Granular Control: By leveraging Network Security Groups (NSGs), we created a “least-privilege” communication path where only the Web Tier can talk to the Data Tier.
- Reliable Connectivity: Through Private DNS Zones, we’ve moved away from hard-coded IP addresses, allowing our services to communicate via internal hostnames—a must for any scalable production setup.
- Verification: Using
Test-NetConnectionandnslookup, we confirmed that our security rules and name resolutions are functioning exactly as planned.